Thursday, October 25, 2012

Recipe testing: Chocolate Chunk Muffins

My dear friend Zoe Nathan is writing her first cookbook, and it's going to be major. The collection will focus on baked goods, and she's asked a few of her nearest and dearest to do some recipe testing for her. Of course I jumped at the opportunity to both help her out, and to preview what's to come in the forthcoming book.


My first assignment: Chocolate Chunk Muffins. They were crispy on the edges, tender inside, and full of good dark chocolate. What's not to love?


I can't wait for this book to come out.

Sunday, October 21, 2012

This week in the garden & basil pesto

Scarves, raincoats, and bike fenders have come out of summer storage and that is my cue to harvest and rip out all our summer season vegetable plants. Tomatoes, squash, basil, cucumbers, and tomatillos have all met their final resting place in the compost pile. I've brought the last of summer's bounty inside to eat right away, freeze, can, or to allow green tomatoes (still on the vine) to ripen on the counter.


Disease prevention: I harvest these plants not only so that I can get to them before our cold night time temperatures destroy them, but also for disease suppression. A good fall cleanup is one of the most effective steps we can take to prevent both insect and disease problems in the following growing season. I don't leave any roots, stems, leaves or fallen fruit behind because these residues provide food for vegetable-eating microbes and larvae over the winter, and I'm not interested in hosting the buggers.

To 'handle the harvest', this time of year I typically make a lot of sauces, and either freeze or can them to eat throughout the winter. My most frequently used freezer sauce is basil pesto. Everybody makes it slightly differently, but here's how I do it.

Basil Pesto
All measurements are approximate and exact ingredients will change depending on what I have on hand.
3 1/2 cups fresh basil leaves
1 tsp kosher salt
2 cloves garlic
1/4 cup toasted nuts (walnuts, pine nuts, hazelnuts, and almonds are all good)
1/3 grated cup hard cheese (parmesan and pecorino romano are both delicious)
3/4 cup extra virgin olive oil


In addition to the basil I add olive oil, salt, garlic, a hard cheese like parmesan or pecorino, and toasted nuts (usually pine nuts or walnuts, but today I only had almonds and they turned out delicious).


In a food processor I chop two cloves garlic with a good pinch of kosher salt. Then I add the nuts and combine until smooth. This way I can get the garlic and nuts very fine without having to over process the basil.


 Next I add about 3-4 cups of basil, about a third of a cup of grated cheese, and about 1/2 -1 cup of olive oil.  


I blend until smooth and silky, and adjust the amounts of olive oil and salt to my liking. I typically like my sauce pretty thin and smooth so I use a lot of oil, but you may not like it this way as much as I do. If not, just use less oil. Sart with 1/4 cup and add more until you reach the consistency you like best.


My favorite way to freeze pesto is in ice cube trays. I put 1 Tbs in each square and then freeze for at least 24 hours. I only have 4 ice cube trays, so any extra gets frozen in small tupperware containers. 24-48 hours later I pop the pesto out of the trays and transfer to a resealable freezer bag.   


I (almost) always write the contents and date on the freezer container. I typically think that I'll remember what's inside, and when I made it, but 6 months later there's just no way.
I believe that this pesto will last at least one year in the freezer, but I've never made it past 9 months before running out.

I love to use the 1 Tbs servings to spread on toast for fried egg sandwiches, and to mix with mayonaise for roasted turkey or BLT sandwiches. I defrost the tupperware containers when I want to use it to coat pasta.

What's your favorite way to make pesto? Have you tried it with greens or herbs other than basil? I once was at a dinner party where someone added butter to their basil pesto and it was delicious!
 

Monday, June 4, 2012

The best spinach you'll ever eat

A few years ago a stumbled upon the best spinach variety I've ever had - anywhere. The variety is called "Catalina" and I get it from Renee's Garden seed company. It's not only delicious, but also a reliable grower.


I hate it when raw spinach makes my mouth feel funny, or more specifically my teeth feel funny. Do you know what I'm talking about? Well this variety doesn't do that! Amazing right? It's tender and sweet, and even a bit soft. Like other spinach varieties it grows best in spring, and then bolts (goes to flower) once the temperatures pick up in early summer. At that point all spinach varieties need to be pulled up and replanted for fall harvest latter on in the summer (in Seattle that means mid July).
Spinach like this can't be cooked. I mean, how could you? Lately we've been eating classic spinach salads with hardboiled egg, white mushrooms, crispy bacon, and balsamic vinaigrette. Yumm.


Simple balsamic vinaigrette
3 Tbs balsamic vinegar
5 Tbs best quality olive oil
1 tsp maple syrup
1/2 tsp dijon mustard
1/2 tsp sea salt


Whisk until smooth and emulsified. Taste and adjust for personal preference - everyone likes a slightly different oil to vinegar ratio, so adjust until it's perfect for you. 

Sunday, June 3, 2012

Green salad with feta, mint, peas, and cucumber

When the days are warm but not hot, and the nights are cool but not cold, it is prime lettuce season. Now is the time of year when Jacob and I eat big meal salads every day. Despite our constant picking, the lettuce keeps on coming. It grows so lush, it looks like we never harvest at all. Amazing. I grow a 'cut and come again' mix from Renee's Garden This means that I usually harvest the outer leaves from the plants, and they just keep growing. I find this WAY more efficient than harvesting an entire head of lettuce, and having to replant each time.

Lettuce growing like gangbusters in our backyard
garden  as of this afternoon (June 3rd).

To some a meal salad sounds too light to be satisfying, but this shouldn't be the case if you pack it with all kinds of delicious (and not so light) items like chicken and cheese. Such is the case as with this salad, which is an iteration of a Patricia Wells recipe.

This salad is delicious, simple, and oh so fresh tasting. Paired with a glass of wine and some crusty bread, it's perfect for a late spring dinner in the back yard. Here's how I make it:


Green salad with feta, mint, peas, and cucumber
A couple handfuls of fresh salad greens (about 2-3 cups)
1/4 cup diced cucumber
1 Tbs chopped mint leaves
1/4 cup crumbled feta cheese
1/4 cup shredded chicken
1/3 cup chopped raw sugar snap peas, still in pods

Toss salad with the juice of half a lemon, a drizzle of your best olive oil, and a sprinkle of sea salt.

Other items that sound good, but I didn't have on hand today: avocado, sliced radish, salty sunflower seeds, chives.

Thursday, April 26, 2012

Kale and apple smoothie

Kale and apple smoothie: yumm or yuck?

Have you ever tried a kale smoothie? I hear people talking about green smoothies all the time, but I'd never tried one before this week. Frankly, they always looked and sounded gross to me. I mean come on, I don't think I want to drink pureed greens! Gross.
Then a few weeks ago, during our regular Monday night "yoga" session (aka stretching and girl time), my friends Amber and Haripurkh were talking about how much they love kale smoothies. Really? They like the way they taste? Then Haripurkh said that she adds apple to hers, uses water as a base, and that they taste sweet and refreshing. My curiosity was piqued.
After searching for recipes on internet, and rummaging through the garden and fridge for ingredients, I ended up with something surprisingly delicious. My girls were right!

Kale and apple smoothie made with
water, lemon juice, and fresh mint
1 cup kale - packed (or greens of your choice)
1 cup water
1 medium apple, diced (about 1 1/2 cups)
juice of 1 lemon
2 sprigs mint (10-15 leaves)
1 cup crushed ice

Blend together kale, water, apple, lemon juice and mint until completely smooth. Then add crushed ice and blend a little more, until desired consistency is reached.

The kale doesn't really add that much flavor, it tastes more like an apple, lemon, mint drink. Surprisingly refreshing is right. Thanks Amber and Haripurkh!

Have you ever made a green smoothie? What do you put in yours? I'd love to know for inspiration.


Above are the ingredients for the smoothie I made today. That's 'lacinato' or 'dinosaur' kale in the front and chard in the back (both overwintered in my garden really well). This is the last of my winter kale so I subbed in some chard, and it worked out just fine. There is also a Eureka lemon from California, a Fuji apple from Washington, Moroccan mint from my backyard, and crushed ice from the Cedar River watershed (okay I put that last bit in just to be obnoxious).

'Lacinato' kale seedlings. If I want more kale I have to
wait for these little cuties to grow up!

I have plenty of 'bright lights' chard left in the garden from last year. It overwintered really well, which is perfect for early spring, when everything else is so tiny.
'Bright lights' chard is an assortment of different colors, but I love the fuschia pink!
Can you see the chives tucked behind the chard leaves? I'm so happy it's spring. 

I like to grow mint in pots so it can't take over my garden beds. It's a very aggressive plant!
This is 'Moroccan' mint, which is fantastic in drinks.
If you are a "challenged" or new gardener, try growing mint! 


These apple blossoms are a sign of good things to come. 
Did you know that we got our apple tree for free through 
the City of Seattle? Check it out here: Seattle reLeaf

Sunday, April 22, 2012

Do you have chickens?

Happy spring! Temperatures today reached into the mid 70's and it was fantastic. I think all of Seattle was in a good mood. Winter has finally lifted, the days are long, and there are blooms everywhere. That's all fabulous, but the most exciting thing to happen this spring for me, has been our new chickens! They are such sweet birds, and their eggs are incredibly rich.

Poor Marilyn got caught and had to pose for a picture with me.
I gave her a shrimp as a thank you present!

Do you have chickens? If so, how many? What do you feed them? How old are they?

We purchased one-year-old birds, so as to go directly to the laying phase of their lives, and to avoid the difficulty of chicks. We got them from a teenage boy in Lynwood who has clearly turned a hobby into a small business. I love the idea of supporting a young entrepreneur. We named the girls after talented women who died before their prime: Billie, Marilyn, Janis, and Whitney. Originally we had Amy too, but she died. We're not sure why, but we understand that that happens sometimes. It was sad and disappointing, but we're not too upset about it.

The cool thing is that we are sharing the hens with our next door neighbors. It's totally fun and easy to have another couple to share the responsibility with. Plus, we've gotten to know our neighbors much better through this experience. I really love it. We've discovered that four hens is probably the minimum we'd want to share between four adults, so we're looking into getting a few more. Any suggestions for what to name them?

Of course we've been eating eggs like crazy these days. Here are some eats from this weekend:

Look at how tall that yolk stands up. 
Saturday morning's breakfast was rice and beans, and sautéed radish greens, with a fried egg on top. Yumm!

Later in the weekend we made these baguette sandwiches: hard boiled eggs, charred asparagus, pickled shallots, mustard & olive oil, and fresh spring herbs. Dill would have been nice, but I don't have it growing, so I used chives, parsley, and mint.


Do you raise chickens, or ducks, or other "livestock" in the city? We have bees at our Alleycat Acres Beacon Hill site, but someone else takes care of them (Bob Redmond of urban bee company).
What is your experience? I'd love to know. I'm very curious about raising livestock for meat. Have you done it?

Monday, April 16, 2012

Radish greens: have you tried them?

I had never heard of eating radish greens until a couple years ago, when a friend of my from Alleycat Acres pulled a radish from the ground, brushed the soil off the root, and popped the whole thing in her mouth. I had never seen anything like it. I tried it and I liked the greens a lot!

Since then I've learned more about radish greens, and in particular I have learned that I only really like them when they are very young and tender. When very young they taste sweet and peppery, as opposed to when they get older and the leaves turn tough a prickly. Ouch.


I love radishes partly because their arrival marks the beginning of spring.

I like to plant an assortment of radish varieties. I get assorted seed packets called "Easter Egg".
That way there is a range of colors, sizes, and flavors in the radish patch.
They also mature at slightly different times, which means we don't get a huge flux all at one. 

Don't they look like sweet little jewels?


Last weekend we thinned the radish seedlings at Alleycat Acres' Beacon Hill site, and rather than tossing the thinnings in the compost pile, I took them home to eat.
Besides eating them raw with the baby root still attached, I also sautéed them with some garlic and olive oil (similar to how I often prepare spinach, chard, or kale), and I tossed them in a green salad.

Dressed salads do not photograph well, so I apologize for the horrible photo, but I thought this salad was really delicious. It was simply a salad of baby radishes with their greens still attached, arugula, romaine, shaved raw asparagus, and dressed with lemon juice, olive oil, and flaky sea salt. So simple and delicious.

Radishes and their greens wilted with lemon juice and
added to a salad with arugula and shaved asparagus

Here are some links to other radish green recipes that sound interesting:

Spicy stir-fried radish greens
Roasted radishes with brown butter, lemon, and radish tops
Radish greens cheese spread or it can be a butter spread.

Hope you guys are as excited about spring gardening as I am!

p.s. Come garden with us at Alleycat Acres! We have a ton of fun, and are always looking for more volunteers. I'll be gardening at the Beacon Hill site every Tuesday evening at 6pm starting May 1st, through the fall. 3656 24th Ave. S, Seattle, WA.

Monday, March 26, 2012

Egg party

Last weekend I had some friends over to dye easter eggs. I hadn't done it since I was a kid, until last year when a friend of mine from LA had some of us girlfriends over for some egg dying (thanks for the awesome times and idea Veronica!) I had completely forgotten how much fun it was.

When was the last time you dyed eggs, or carved pumpkins, or made your eggs green on St. Patrick's Day? No reason why kids get to have all the fun.

Watch out Martha!
Okay, we got most of these ideas from her iPhone app...
Yes she has an iPhone app specifically for easter eggs.


Can you hear us clucking through all that glitter and Mod Podge?


Janessa made that grass out of green thread!


How did Sarah write so neatly with glitter?
I could never do that.


Some of the eggs were blown out so we can keep them forever, but many were hard boiled.
Turns out blowing out eggs is way harder than it looks on Martha Stewart iPhone app. 

I got really into thread this year. Monochromatic and simple. 

Thanks for the inspiration Jackson Pollock. 

Rubber bands

These were done like decoupage, with paper and Mod Podge (craft glue).
I like this one that Mindy made, using cut out recipes, all containing eggs as an ingredient!

This is a sprig of parsley from my garden. I glued it on, and then died the egg.
It would have been better to dye the egg first, but oh well.
I'm happy to report that the leaf is still green after a week. The glue is acting like a preservative. 

Glitter, glitter everywhere. 

A few days after the egg party I made egg salad with the hard boiled eggs. It was delicious. It didn't last long enough for me to take a picture. Jacob had the excuse that he didn't want it to go bad, but neither one of us could stop eating it. It was really that good. I think that egg salad is one of those delicious and easy recipes that has gone out of vogue. Not sure why. Let's bring it back. 
I made mine with 
hard boiled eggs
finely diced sweet white onion
canola oil mayo
sea salt
a dash of cayenne
a dash of paprika

Monday, January 30, 2012

Shipping Pallet Vertical Planter

A few months back I stumbled across this awesome idea to turn a shipping pallet into a vertical planter on Fern Richardson's blog. Is Fern not the best name for a gardener? I'm secretly jealous.
A few weeks ago I took the time to make one myself, and I'm super excited about how it turned out!

.


I LOVE the beauty and feel of living walls, and of course I'm all about reclaiming waste materials and turning them into something truly special, so this was definitely the project for me.

Below is a tutorial on how I made this vertical planter, but again I got my directions from Fern:

Materials:
1 shipping pallet, no longer in use
36-50 plants in 2" or 4" pots, depending on the size of your pallet
landscaping fabric
staple gun
potting soil + compost

1. Find a pallet that won't be used again
Most pallets get used over and over again, but those that are broken or damaged cannot be used for carrying heavy things with a forklift anymore. These are the ones you want to get. I got a broken pallet while I was picking up some compost at Sawdust Supply, but I sometimes see them in parking lots behind big stores like Best Buy and Costco. I'd ask before taking one... especially to make sure it's not still being used.

Fix your pallet if it needs it. Make sure there are no nails poking out that need to be hammered back in, big splinters that need sanding down, or loose boards that need to be secured.

2. Line your pallet to hold in the soil
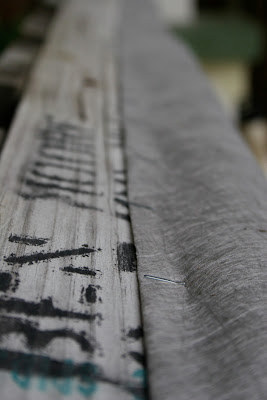
Decide which side of your pallet will be the front, and which will be the top. The front should be the side with narrow slats (no more than 4 inches).

Line the back, sides, and bottom of your pallet with a double layer of landscaping fabric. Pull the fabric taut across the top edge of the pallet, without covering the opening at the top, and using a staple gun attach it to the pallet. Put staples in every 2 inches. Then continue down the sides and the bottom like you are wrapping a present. Remember to make everything neat and tidy so it will look nice.


Landscaping fabric stapled along the top edge of the planter.
Notice that the opening is still free to plant in. 


Landscaping fabric stapled along the vertical sides of the planter. 

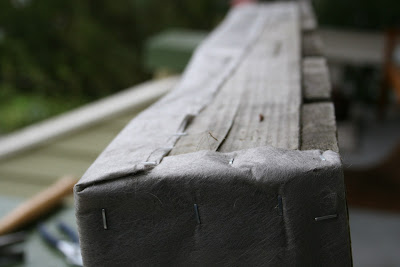
This will be the bottom side of the planter. Notice that I covered
the holes at the bottom without pulling the landscaping fabric onto
the front side. This way it will be less noticeable when planted and upright.


This was the hardest part of the whole project for me, but it really wasn't very hard at all.
Don't cover the top of the slats on the front of the pallet, as you will plant these areas.

3. Fill your pallet with potting soil
With your pallet lying on its back, fill it with potting soil and compost through the slats in the front. I like GroCo compost a lot, so I like to add it to all my potted plants along with a light potting mix, like Gardner and Bloome's planting mix. My pallet was 3.5' by 3.5', 6" deep, and I used about 3 cubic feet of soil all together. You really want to pack this stuff in tight!

Make sure the entire planter is filled with soil.
It won't work if there are gaps between the rows, because all the soil
will fall to the bottom when you turn it upright. 

4. Arrange your pots on top of your pallet
Do this to figure out the pattern in which you want to plant them. This part is sorta like painting. I tried to cluster types of plants, and went for a variety of contrasting textures. I moved things around a little bit until I was happy with how it looked.

I tried a few arrangements before I got the plants how I wanted them.
Leaving them in their 4" pots made it easy to move them around

5. Plant your pallet
Plant from the bottom up. Make sure that your plants are packed in there really tight! I found that I needed to add more soil as I planted because I kept on pushing soil down towards the bottom. You want the plants to be snug so that no soil or plants fall out when you turn the pallet upright.
Don't plant the very top yet!

6. Leave your pallet horizontal for a couple weeks
It will be hard to wait, but this will allow roots to establish and will keep soil and plants from falling out the front.

.

.


7. Turn your pallet upright
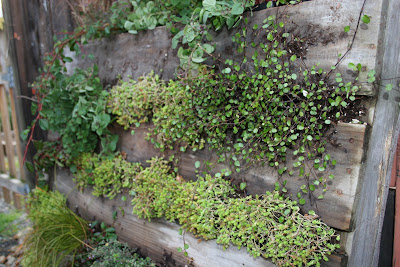
Yahoo! Now that your plants have had a couple weeks to establish, you can turn it vertical by leaning it up against a wall. At this time you should plant the very top of your pallet. I added a tall grass in the corner for a little verticality, and because I thought it looked fun. I also added more wintergreen because I love the way it looks trailing down across the lines of evenly spaced plants.

.

.


.

.

.

8. Maintenance and Care
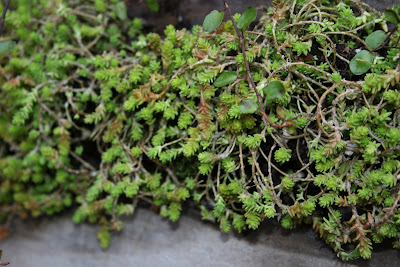
These types of planters tend to dry out quickly. Once our rainy season ends (will it ever end?) it will likely need to be watered every other day. Water by using a gentle spray to irrigate through the top, and also give it some water from the "front" (i.e. try to spray directly into the slats). I'm hoping that the fact that I planted hardy drought-tolerant succulents, herbs, sedums, and grasses will serve me well through the summer.

Wouldn't it be neat to plant strawberries in one of these? I'm imagining a strawberry fence...

Thanks Fern for the inspiration!

p.s. Looks like the ladies at design*sponge were also inspired by this project.